I have been looking forward to this product update ever since it was rumored that Nikon was working on it.
(Image courtesy of Nikon USA)
I finally had the opportunity this weekend to take the lens out and see what it can do. I am very impressed by how this lens feels in my hands. Attached to my D3x it feels great and carries well on the Vulture Strap A2 that I have also been testing.
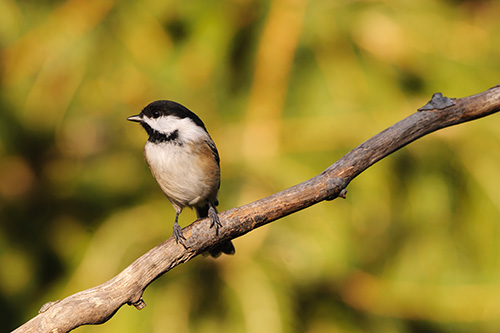
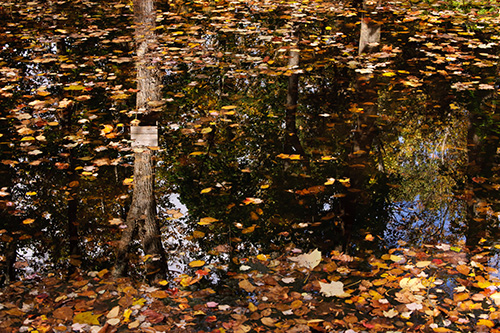
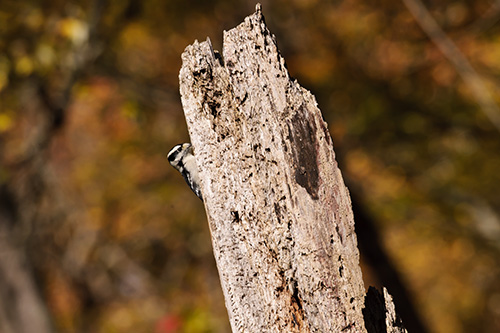
I visited the Bristow Sanctuary in my town to see what fall images and possibly birds I could photograph.
As you can see from these images the lens is very sharp. Focus is extremely quick and the quality of the images out of the camera are sensational. I especially love the tree and leave reflections in the image above.
I also like the detail captured in the tree and Downy Woodpecker above.
Overall this lens is highly recommended and might displace some of the other lens in my back given the weight savings. This lens will also make a great big game lens for times I need to carry both a 600mmf/4 and the 80-400. The space and weight savings over a 200-400 are significant. All and all I am very happy with this purchase.
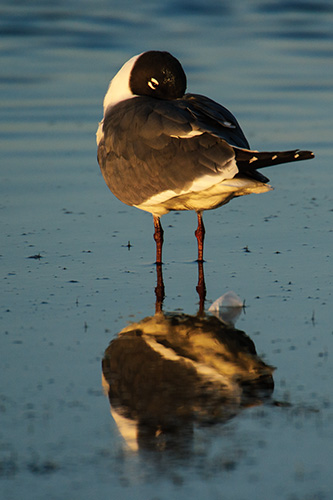
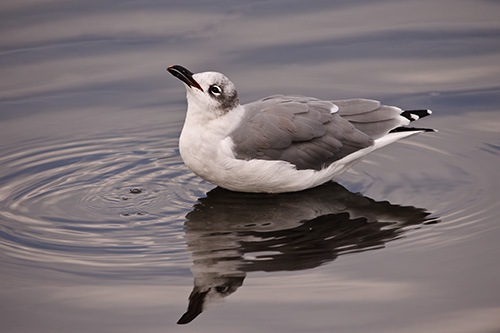
Laughing Gulls are a rare subject in avian photography. No matter where you go, they seem to be ok with a photographers presence. I think if someone with a big black shiny tube that had 3 long black poles sticking out of it, walked or crawled toward me at a slow pace, I would hightail-it out of there as fast as I could. Especially if I could fly :-).
Yet these interesting birds seem to love to put on a show for us. They also do some really funny things if you sit and observe them long enough. Thats the important message here, if you sit and observe long enough. Avian photography is all about putting in your time. Things don’t just happen because you are there. You have to wait for them to happen. Hopefully, you put yourself in a position to take advantage of when they happen! Often knowing when something is going to happen is the result of good research (understanding your subjects biology) and observing the subject so you know when certain behavior has a great chance of occurring.
I think the patience aspect of bird viewing and photography is one of the reasons I like it so much. My life is full of schedules, timetables and the need for instant gratification. When it comes to nature, mother nature decides what you see, when you see it and how you see it. Thats why every scene, event or creature we view is different and special. A lesson we should learn for our every day lives as well. All too often we take for granted what we have right in front of us, only to be devastated when it is no longer there.
Images captured with Nikon D3x, 600mm f/4, TC-14eII on Lexar Digital Film
I received an email after my recent post about seeing and photographing a new bird species in my yard. That species was was a House Wren. There is nothing like the exhilaration associated with this adding a new species to your files and life lists.
Female Northern Cardinal
The email I received asked how close I was in order to make these images? He knew of my own standard of not cropping or post processing my wildlife images. (The only images I apply post processing to are artistic in nature, like landscapes). I told the reader I was about 12′ from this branch which is the mfd (minimum focusing distance) for my Nikon 600mm f/4. The question in his followup email is the basis for this post.
Female Northern Cardinal 2
So here is the question; How do I get that close?
Here are my tips for getting close to the birds.
1) Try to have something between you and your subjects, like a fence or a shrub. It usually makes the birds more comfortable.
2) Wear dark clothes. Try to avoid anything reflective or shiny.
3) Remove straps from your camera. To a bird they look like talons hanging from a predator.
4) Once you find your spot, stand still and be patient. You may have to wait 30 minutes before birds will return to the feeder. The great thing about this tip is you get to just enjoy the birds, weather and your surroundings.
5) When the first birds return, continue to stand motionless, don’t attempt to photograph the first birds.
6) The most successful position I have found is to “hide” behind your tripod and camera and use your free eye to watch the feeder. If you move unexpectedly to photograph a subject that lands on the perch, you will most likely scare them. (Tip, while you are waiting for the action to start, make sure your nose and mouth are to either side of the eye piece to ensure you dont fog up the eye piece!)
Realize that the tips I have here are general. I have found over the years that these work consistently for me. But I must admit that I have to make some adjustments depending on the species I want to photograph. In particular, Cardinals and Blue Jays prefer I am further away from the feeders than say Tufted Titmice or House Finches. What I usually do in this regard is to start close to the feeders and then retreat to a location further away. The only way you will know is by trial and error. But that is what makes it fun!
Its amazing how this topic seems to be on the minds of so many people. I bet I get a few emails a month from folks asking for help designing and/or building a backyard bird photography studio. I have tried many different gadgets and setups for my backyard bird photography studio, both home-made and purchased. In fact I have tried as many setups as I have camera bags! Just like camera bags, different yard setups present different solutions and complications depending on weather and time of year. What I will attempt to do in this post is talk about and show you how I have generated the most consistent results in my backyard bird photography studio. I will give you one warning before you read this post. I follow the KISS method in my photography. KISS stands for Keep It Simple Stupid :-). If I had a dollar for every time someone asked me how many lights I setup in my backyard or how big or what kind of a tent I use for a blind, I would be rich. The simple answer is I don’t use any of these things. I know, I know, some of you will say you have to use lights if you are going to stop the action of a hummingbirds wings or counteract the effects of the harsh mid day sun and this is true, in some applications. I will give you that using a flash when photographing hummingbirds is helpful but not required. As it relates to using a flash to help counteract the harsh midday sun my response is I don’t photograph in the harsh midday sun. Have I used flash in the yard for special effects, yes. Do I use it often, no.
So lets talk about the basics of backyard bird photography studio. What do you need for this to be successful? The first thing is you need to be able to control your background. There is nothing worse than a beautiful bird on a branch, with 20 other branches in the way or a sky scraper in the picture along with your subject! What you also need to consider before you select a location for your feeder is the angle of the sun and where you will be standing in relation to the sun and your feeder. Ideally, you want the sun to always be behind you (over one of your shoulders) so that you will be between the sun and the perches/branches you will be photographing.
Basic Setup
In the picture above you will notice 3 locations for birds to land, eat and drink. All 3 are highlighted by white arrows. I will show you closeup images below to help. If you notice, I have placed the feeders, bird bath and large perch in locations where the birds can fly in and out to the woods easily. I have also made it easy for little song birds to hide in bushes and make their way to the feeders using the cover of the shrubs for safety. You should also notice that I do not place any of the feeders near windows in an attempt to limit window strikes.
The feeders and stands I am currently using are made and sold by a company named Wild Birds Unlimited (WBU Link). I have found their products to be excellent and the store employees to be very helpful and friendly birders. I use the APS System (APS Link).
Here is the view of the main feeder from the driveway where I usually shoot from. Notice the clean background behind the perches.
Providing water is an essential element to having happy birds at your feeders. In fact, water is often more difficult for them to find than food so if at all possible, try to provide this. I am actually considering burying a water feature in the ground nest spring for a different angle from which to photograph my birds!
Hopefully this post gives you some ideas on how to layout your feeders and perches on your property in order to give you the best opportunities to photograph the birds in your backyard.
Notice all the feeders have squirrel and raccoon bafflesSecond setup with ranch style feederAnther view of the ranch feederClips sold by WBU to hold branches/perches
So I thought that I would provide some examples of images you can take in the yard with and without special effects. The two images of a Ruby Throated Hummingbird were both created without using flash. Nope, just plain old fashioned sunlight. Its just how you use that sunlight! The bottom image is taken using flash. The intent was to try and give the viewer the impression that the bird was actually photographed in front of a black background. It was actually photographed in front of a tree. Its amazing what you can do if you use your imagination when it comes to photography. Don’t be afraid to experiment with your photography!
Ruby Throated Hummingbird with an itchRuby Throated Hummingbird looking for some nectarAmerican Goldfinch photographed with flash to blacken the background and make his colors pop!
I received some interesting emails after my last post There’s No Place Like Home. Most were requests to see my backyard bird photography studio or advice on setting one up, which will be the subject of my next post. However, one email in particular made me think a little after I read it. Given the outpouring of support for Pledge 2 Fledge, I decided this post should be about the beauty of common bird species.
White Breasted Nuthatch
You see, the reader of my last post seemed to think they were getting bored with just photographing the same species and wanted to branch out (pun intended :-)) into different species but didn’t have the time or companionship to make that next move. What I tried to do in this post and in my email response to the reader, is show some common backyard and park species doing something special or looking really good!
American Goldfinch MaleAmerican Goldfinch Female Preening
One of the most important things in bird watching in my opinion is observing varying bird behaviors and learning to appreciate and see the differences in the birds as the seasons change. How could you ever be bored with that?
Northern Cardinal Male TransitionalHouse Finch MaleBlack Capped Chickadee
Tufted Titmouse
I hope you agree, that there is beauty in common. Now go out and enjoy some common bird species! And remember, we are all out here because Birding is Fun!
Images captured with Nikon D3x w600mm f/4, TC-14e II on Lexar Digital Film
I have some exciting news. The BT Journal, published by Moose Peterson, has recently put the issue in which I was published, on their iPad APP! Here is a link to the BT Journal iPad APP. I hope you decide to purchase the issue and use the APP. The BT Journal is one of my favorite wildlife/wildnature photography magazines and it is even better now that you can read, hear and watch the magazine on the iPad!
Also, here is the LINK to the original post where I talk about my time with Moose that led to the BT Journal publication.
My friend Denise Ippolito just updated her workshop pages. She has some great events coming up, a few of which I am trying to attend myself. There are not many good photographers that offer quality workshops on the east coast however Denise is one of them. Besides she is a real sweetheart as well.
I had the pleasure of meeting Chris Bridges in 2009 at a workshop held by Moose Peterson. We hit it off pretty much from day 1. I’m not sure whether we became good friends because we both like the same movies or the same jokes or that we both have a few screws lose if you know what I mean? One thing I know we agreed on during that workshop was we had a lot of things to learn about imagery and creating media and that we are both passionate about striving to create the best images we can. Since then we have had a lot of fun trying to do just that.
Chris has created a new website so that he can share his passion with all of us. Above is one of his images made while out in Moab Utah, a trip I was supposed to attend with Chris :-(. Please stop by and check out his work, you won’t be disapointed!
I have been experimenting with intentionally blurred images as of late. For the most part I am not an artsy fartsy photographer. However, I do like some of the results I am getting.
Water Blur
Besides, it gives me something else to think about and do while I am waiting for the wildlife to do what I want it to do! Sometimes that can mean a lot of waiting! As you can tell from this image, I have a lot to learn about this aspect of my photography. You know what that means? Shoot some more.
Wow! I was blown away by how many people commented on the last post on NYC Skyline HDR & Pano. So I decided to share this image which is attempt at an intentional blur I made.
New York City Skyline Intentional Blur
I tried several different patterns by moving the camera during the exposure. Below is an example of moving the camera in the shape of a crown, more silly than an artistic masterpiece :-).