I had much inspiration this weekend. I recently upgraded my Nikon D700 to the new flagship D4s. I also spent the whole weekend outside which was a welcome relief to the horrible winter that I hope is now in the record books.
My last bit of inspiration comes from my soon to be 98 year old grandfather that battled back from pneumonia this winter to defy all his doctors who gave us no hope of him recovering. Yes, he is still alive and kicking, like an old Cadillac, they don’t make them like that anymore.
To say that the D4s is a beast would not be doing the camera justice. I truly believe it is the best of the Nikon cameras that I have ever owned.
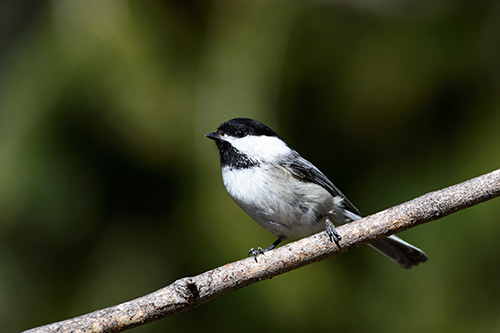
The first image below is of a Black Capped Chickadee.
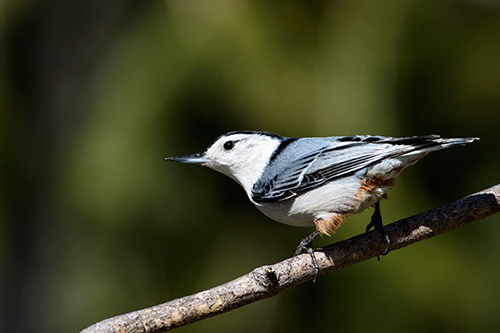
This White Breasted Nuthatch is a favorite of mine. I have had them in my yard since I started photographing birds. They have a tendency to to be skittish so getting some good glass on them is not always easy. You can see the incredible feather detail on both of the bird images.
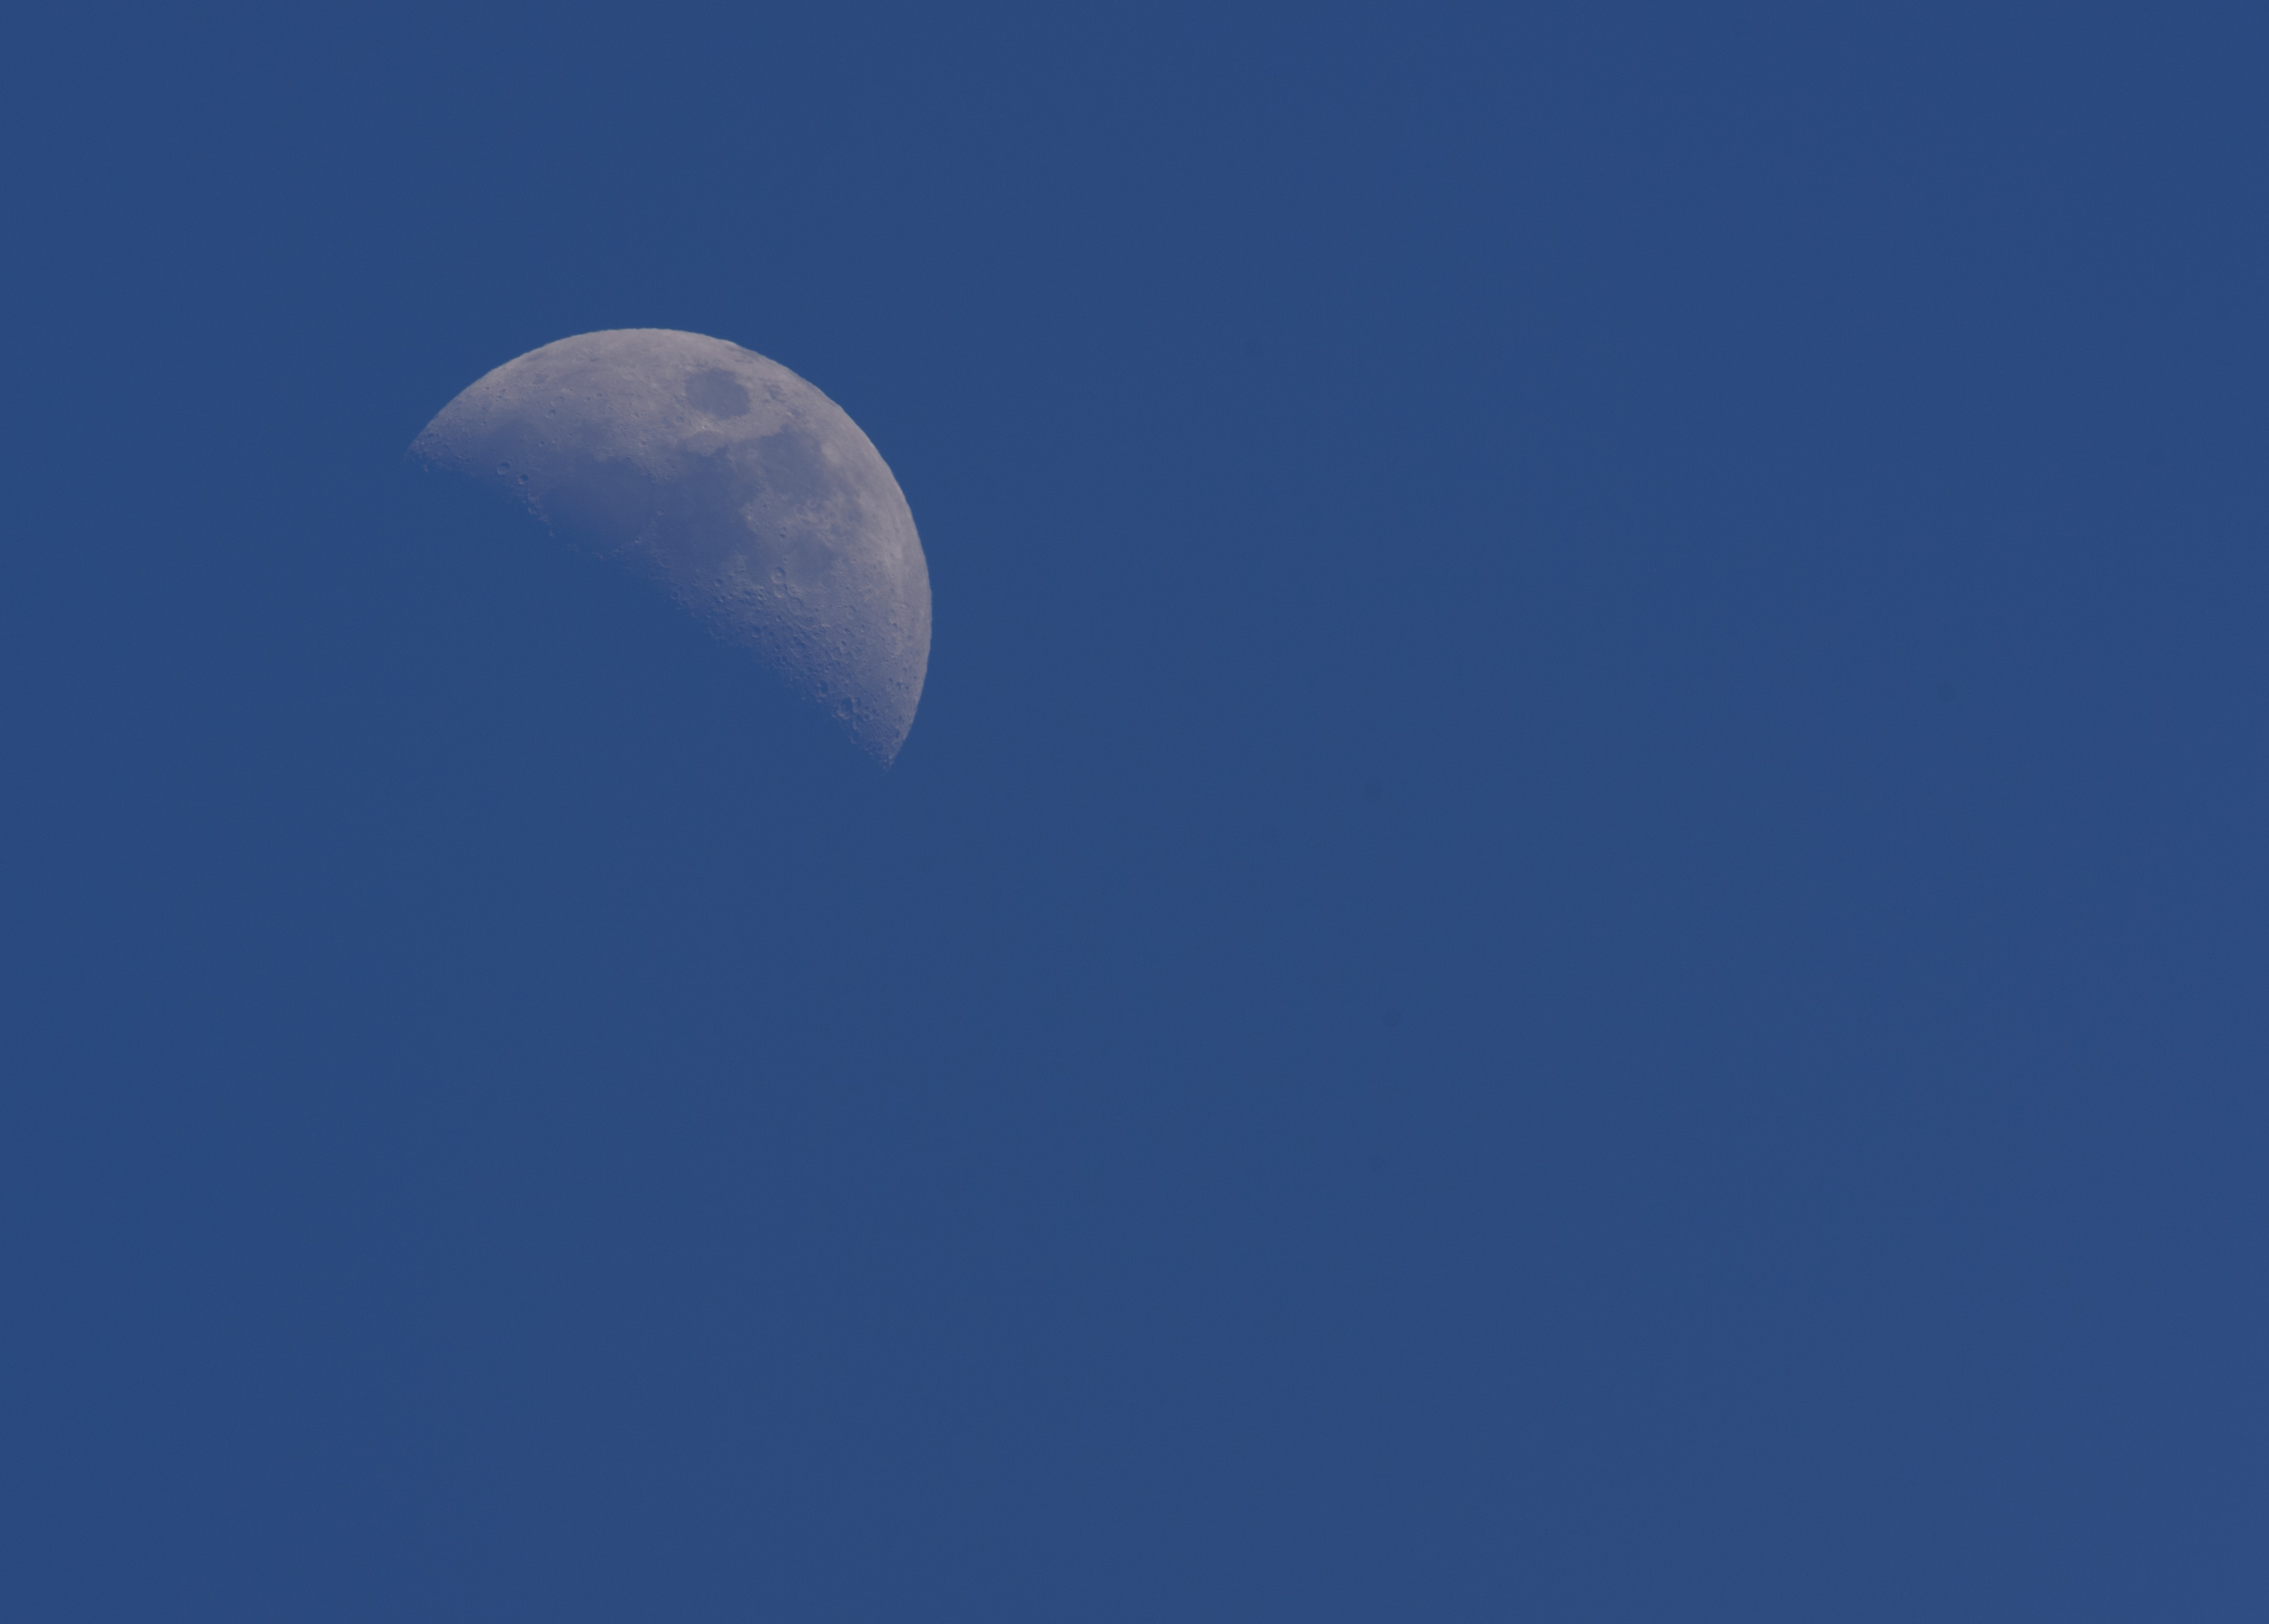
This image of the moon was a bit of fun. I actually think it looked majestic in the sky smack dab in the middle of the day.
I have rebuilt my digital darkroom and am also using a whole new setup which I will share with everyone at a later date. Its a completely laptop based system with top of the line, high speed external drives. Yep, you heard it, no desktop computers. The reason I bring this up is that all of the images above are right out of my new D4s, I did not do anything to them as I have not finished building my Photoshop CC workspace (which I hope to do between now and Easter).
Hope you enjoy the images and sorry for the long absence from posting. I hope to have some regular post for you now that Spring is here and I can get out with my gear again! My next goal is to rebuild my blog and possibly the website to allow for higher quality, larger images.
I have been asked by family, friends and readers what gift suggestions I can make for photographers on their gift lists. I figured it was time to share those suggestions with everyone. In creating this list, I held 2 things constant. I don’t receive compensation from any of the product producers and they are products I use and love. I also kept the list to 5 products I use regularly. So without further ado……
1) The Blubb. Blubb
The Blubb is the tool that makes using your vehicle as a blind possible. Its a must have if you plan on shooting from your car or truck. I also use this on the window sill of my garage window allowing the garage to become a blind for a set of feeders I have a few feet away!
2) Aqua Tech Sensory Gloves.
Finding that balance between the ability to use the cameras controls and staying warm is something that all outdoor photographers struggle with. In particular, those of us that chase good light are always cold (good light comes mostly early morning and late afternoon. I wear these gloves regularly. They are however, not good for real cold climates. I have tried using thin liners on colder days with good success. However they are not for snowy conditions. For such conditions I recommend using Cross Country Skiinig gloves with thin liners.
3) The Art of Bird Photography I & II.
These 2 books are must reads for anyone that wants to learn about avian photography. Arthur Morris is one of the masters in this space. He provides tons of information on his website about wildlife photography. The Art of Bird Photography I & II
4) Captured by Moose Peterson Captured
This book is a compendium of Moose’s life as a wildlife photographer and endangered species expert. Its filled with information on how he has done it! When I say “done it” I mean everything. Setting up his business, networking, making great images, good and bad lessons learned. It’s all there in a gripping story, a great read.
5) Nik Color Efex Pro 4.
If you plan on doing landscape photogrphy this software suite is a must have. Its easy to learn and the suite of tools is incredibly powerful. This software will alow you to do things to your images that would require 100’s of hours of training if you were to use just Photoshop.
(Note): I do not enhance my wildlife photos. I follow photojournalism standards with my wildlife photograhy. However, I consider landscapes to be art and do utilize software to enhance the image in order to help relay the strory I am trying to convey. This decision is completely personal.
All Photos curtoesy of the website links provided.
Its funny how we come to rely on specific things in our lives. I almost exclusively used Kodak film back in the days of, dare I say it, processing film in my parents basement bathroom! Ill never forget the first time my dad realized that part of “building a darkroom” meant I needed to paint the 1/2 window with black paint so no light could get in. 🙂 But for me that decision was easy. Kodak film had been consistent and reliable and I couldn’t see why I would risk valuable memories and moments to anything else.
So when I switched to an all digital workflow around the turn of the century, ouch that makes me feel old, I tried 2 different memory card brands, or as I like to call them, digital film. In the end, the brand I decided on and have used exclusively now for 5 years are Lexar professional CD cards. The model I use currently are the new 600x Professional UDMA cards.
Lexar Professional UDMA 600x
Knock on wood, I have never lost an image due to Lexar card failure. I always try to be very careful with my cards and only format the cards though my camera. There are a lot of different opinions as to the right way to format or “clean” a memory card but using my cameras has worked for me. As the saying goes, “If it ain’t broke, don’t fix it”!
When uploading images to my laptop on the road, I use the Lexar ExpressCard Compact Flash Reader pictured below.
Lexar Professional ExpressCard Reader
In the office, I have several Lexar Professional UDMA Firewire CF Readers (pictured below) stacked. The great thing about using Photo Mechanic as an ingest program is that it allows for multiple card downloading simultaneously. You can stack up to 4 of the below devices for super fast downloading.
Lexar UDMA Reader
Memory cards are a critical part of your workflow and also a potential point of failure. Selecting a brand and understanding how to use their products is an essential part of your workflow. Lexar recently put together a great video of how they produce their products. Their factory and the factory of some of their suppliers is shown in the video. It is very impressive.
I hope you enjoy watching how technology helps make our lives better and the precision used in these products.
NOTE: I do not currently receive any free product or sponsorship from Lexar. Images curtoesy of Lexar and Amazon websites.
I plan on increasing the frequency of blog postings on equipment. I receive a lot of emails asking me about what equipment I use and which camera settings I prefer. So instead of keeping my thoughts (but not secrets) to just those that ask I think I will share. 🙂
The first item I want to talk about is The Blubb which stands for (Big Lens Ultimate Beanbag). This is also the most recent piece of equipment I have picked up receiving it as a Christmas gift from my beloved wife. The Blubb is the brain child of Art Morris, Avian Photographer extraordinaire. (If you click on the link above, you can see more images and Art’s commentary on The Blubb).
So far I really enjoy using The Blubb. I have looked far and wide for a versatile bean bag. What attracted me to The Blubb in the first place was its design. It is designed from the ground up to use in a car. I often find myself using my truck as a blind when photographing birds. It is not always practical to “sneak up on” birds. It is especially not practical to sneak up on them when the temperature is below freezing! The reason you need something between your camera lens and the naked car door is vibration. Even with the car off, any vibration from the camera is amplified by the hollow metal car door which results in blurry images. It is virtually impossible to get sharp images unless you use some medium in between lens and car body.
I have tested The Blubb on several different car doors and it seems to work well regardless of model or size. I have also used The Blubb on the hood of my truck and given how high it is (and how short I am) it works just like a tripod. If you were to use this on a car hood, you would need to hunch over considerably. The unit I received was well made, sturdy as a rock. I suspect it will hold up well for many years to come. I really like the overall construction.
A few points here. 1) DO NOT use your power windows as a way to adjust the hight of your Blubb and long lens, it will not hold up to the weight. In fact, I like keeping the window down if at all possible. 2) Art mentions in his instructions included with The Blubb to use approximately 16 lbs of pinto beans as filler. I found that 12 lbs was right for my needs. I did also experiment with using bird seed as filler and I think that is a better solution given the decreased cost of seed over beans!
So if you are looking for a bean bag to help you stabilize your camera and long lens from a car, or a dock, or a patio or the ground for that matter, The Blubb is a great compliment to any camera bag.
Note: I do not currently receive any compensation or free products from Birds as Art or its affiliates.
I had the chance to add a new subject to my image files this weekend. One of my favorite things to do in photography is create images of wildlife I have not had the pleasure of observing and shooting before.
Hooded Merganser Male
As I mentioned the other day, I plan on exploring Greenwich Point Park this winter. I headed down there on Martin Luther King Monday at sunrise. As you drive down the main road, there is a pond on your left hand side as you pass the stone gates. This pond is part of a sanctuary. Due to recent snowfall, the walking path around this area is not plowed.
Hooded Merganser Male 2
The night before I saw what I thought was a Hooded Merganser in the pond. However, the subject was back lit and the light was not worth making any clicks. I decided to return in the morning when I could position myself so the subject would be front lit. I had attempted to get out of the car and move around the subject so it would be front lit. However the Hooded Merganser would have none of that and quickly swam off when I got out of the car. So I needed to use my car as a blind. The hope was the park would be very quiet in the morning so I could use my truck as a blind. It worked well. This was not practical the previous eveing given the park traffic and position of the sun at sunset.
Hooded Merganser Female
Caution: The park road is VERY NARROW and due to the snowfall shared by cars and walkers. This park is very heavily used and using your car as a blind is not always possible. It was 14 degrees fahrenheit this morning so I figured I would have little competition for the road from walkers/joggers!
The Blubb
Needing to use my truck as a blind gave me the opportunity to use a Christmas gift my wife purchased for me. The product is called the “Blubb” and is available through Art Morris’ Birds As Art website. I plan on writing a review of the Blubb in a week or two.
The above Male Hooded Merganser was with 2 females. One of the females appeared to be a breeding female. While I added some files to my image library I did not get a shot I am really happy with, due mostly to the fact that the Mergansers wouldn’t come close enough to the truck :-). Even with a 600mm f/4 and a 1.4 TC, I didn’t have enough glass. Another reason is that the morning was overcast and I think the subject would pop if the light was better. I look forward to bringing you captures of this great subject as I head back to Greenwich Point Park.
Note: Picture of the Blubb courtesy of Birds As Art website!
I am receiving a lot of questions about how I store my images and what “backup” procedure(s) I employ. I suspect this is because of the holiday season. Folks are looking for great gift ideas for family and friends and what better gift than something that protects their loved ones valuable electronic data. I will attempt to give you a layman’s view of storage and leave all the technical specs to others. The web is filled with that stuff so if that floats your boat, have fun! So lets start by talking about Storage.
Storage can mean a lot of things. It definitely means different things in the context of how one uses storage devices. I will list here what I use for my portable digital darkroom and my office digital darkroom. I have an all Apple system. However, the procedures and precautions I employ work for Windows as well as Apple systems.
So lets get one point out in the open first. I am anal and paranoid when it comes to storage and backup. This will be confirmed over the next few blog posts! If my methods seem like overkill to you, sorry. But this works for me.
PORTABLE STORAGE
When I’m on the road I need 2 things when I ingest my days images, 1) Speed and 2) Redundancy. Currently I am using G-Technology G-Drive Mini 500 GB drives to to this. They are small, bus powered and reliable.
G-Tech G-Drive mini
I have 3 of these drives. 2 are daisey chained during the actual ingest process. 1 is the master and the other just holds a backup copy of the ingested files. I also keep my gallery images on both of these drives for showing my portfolio if the occasion arises. For safety, 1 drive goes in my briefcase and the other goes in my camera bag which never leaves my side. The third drive is a bootable clone of my laptop hard drive. This way if the laptop drive fails, I can still work off the clone. That also stays in my briefcase. It is important to note that my laptop hard drive does not hold any media files! The only thing on the internal drive is the operating system and applications. I find that the internal drives and the system in general work better this way. I follow the same procedure for my office workstation.
Above is what I use for the laptop while on the road. When my laptop is home, I add one more step. I use a G-Tech G-Drive 2 TB for backup of the overall system using Apple’s Time Machine.
G-Tech G-Drive
Desktop Storage
So if you thought the above process was overkill, wait till you get a load of this. My MacPro tower has 4 drives inside, arranged as follows:
1) System/Applications
2) Media Files (negatives)
3) Media Files copy
4) Live Work (I take a copy of the negative I want to process and move it here, I also store it here)
Then I have 2 Drobo’s (sorry, i couldn’t find any images of the Drobo to show you but their Website can be found here Drobo) attached to my tower that operate as Raid drives with 4 1TB drives each. Basically these units work in a way that allows for 1 of the 4 drives to fail and the data is still in tact. 1st Drobo is partitioned to backup my Media Files and Live Work. The 2nd Drobo runs Apple’s Time Machine which backs up internal drives 1, 2 and 4. If this were not enough, I have a G-Tech G-Drive mini that I use as a bootable clone of this system disk. I know, you are thinking I am crazy but this “system” lets me sleep at night and I have never lost an image. It also protects me from mistakes being made (accidents) via the Time Machine portion of the backup.
I have to admit however that I am impressed enough with the G-Tech units that I am considering switching my Drobo’s for the following G-Tech units:
G-Tech G-Speed
Why you might ask? The reasons are simple. While the Drobo drives are easy to setup, probably the easiest Raid Array to configure I have seen, their software is proprietary, which means that in order for the drives to operate if the box that holds the drives should fail, you need to find a Drobo unit to put them in. If you put them in a non-Drobo box, the drives, and your data are useless. I am having a hard time feeling comfortable with this setup even though I knew this going into the original purchase. Lastly, my Drobo drives are becoming noisy as they get older and this is making me a little nervous as well. The positive side to the Drobo’s is that they can handle most types and sizes of hard disks which helps to keep the costs associated with massive storage needs to a minimum. The G-Tech units need to use their drives (G-Tech is owned by Hitachi which is a first class drive manufacturer). These drives are more expensive as you would imagine.
I hope this helps in your quest for storage solutions. I might take a shot at creating a workflow diagram over the next few days. If you would be interested in this or think it would be worth a blog post, please drop me a line.
On Friday I will tackle the actual backup process I employ and talk about how I use the above storage solutions in that process.
Disclaimer: I do not receive free items from any of the manufacturers listed nor am I a tester for their gear (at least not as of yet 🙂 ). What is listed here are the items that work for me. There are numerous options and combinations of gear one can employ. This is what works for me. Use my suggestions if and only if you think it would benefit your workflow.
G-Tech images courtesy of the G-Technology Website
Since returning from Africa, I have been asked by several readers about the process of preparing for a Wildlife and Nature photography trip. As I prepare to leave for a week in sunny Florida to photograph migrating birds, I thought it would be useful to explain what I am taking and how I am getting it there.
Like many photographers I suffer from having tried and owned too many camera bags. The simple truth is that we all spend far too much time trying to get everything to fit into one kind of bag. Once I realized that the bag I used for a given trip or assignment needed to be approached in the same way I selected lenses, flash and other accessories, it was like a light went off over my head.
I basically have settled on 3 bags for all my gear. Two of the bags I use are made by someone I consider a mentor, Moose Peterson. The largest of the bags is the MP-1. This bag is a work horse for me and is what I carry when I need to take everything and the kitchen sink. It is also accepted as carryon luggage on regional airlines which in todays traveling world is not only important but a necessity. The next bag I use as my walk around pack is the MP-7. This bag doesn’t look like a camera bag and is light weight and easy to carry anywhere. I can also bring this to events in my checked luggage and break down the MP-1 into this smaller pack for ease of carrying. I consider both these bags must haves for my photography.
The last of the bags I use regularly is made by Gura Gear. The Kiboko is a bag I use in 2 specific situations. 1) I need a bag with good support for heavy loads and when/where hiking is required. 2) I want to have 2 bodies with lenses attached ready to go. This is particularly important when I am in very dusty conditions or poor weather and don’t want to expose my sensor to dust when changing lenses. The Kiboko bag is also accepted as carryon luggage for regional jets. This bag is strong, roomy and has a great layout internally and in the outside pockets.
All 3 of these bags are very well made and come with strong guaranties from their suppliers who are also great photographers. This last element means these bags are designed by people who use them, they live an die by their bags performances.